I’ve been playing around with different ideas for wrapping my gifts this year. Since I now live in the country and shopping time is at a minimum, I’ve had to come up an idea from only the supplies I have around the house.
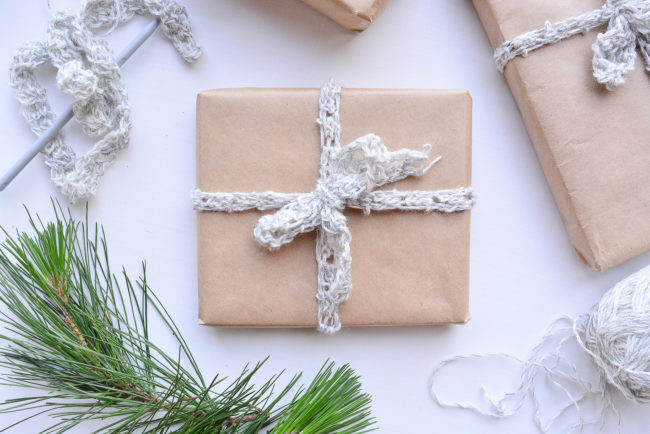
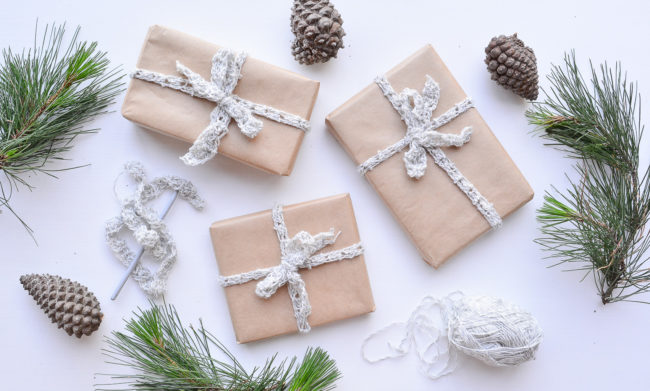
I have a gigantic roll of brown paper, which I have vowed to wrap all gifts in until it’s gone. My mission then is coming up with different ways to “dress it up” so it doesn’t appear to everyone that I have a surplus of brown paper that I’m trying to use up! Somehow out of all the bits and pieces I have stashed away, I came up with a brand new idea; crochet gift wrap ribbon.
I tried my hand at crocheting a while back (am still working on my masterpiece of a blanket two years later!) and there’s lots of wool yarn floating around. This got me thinking…… I played around using the wool on its own as a ribbon replacement but it looked a little sparse, it needed to be more substantial. That’s when I came up with the idea of crocheting a ribbon for my gift wrapping!
Surprisingly, crocheting a gift wrap ribbon is quick to do and it has helped me use up all my wool offcuts. For those interested in spicing up their gift wrap game this year, I’ve shared the 3 easy steps it takes.
What you’ll need:
- Wool yarn
- Crochet hook (I used size 5)
Step 1| Foundation chain
To begin with, you need to make a slip knot and a foundation chain.
The slip knot is a loop of yarn at the start of the chain.
The foundation chain is a series of simple stitches from which your crocheting begins. Because this crochet project is going to be used as a ribbon, the chain only needs to be 2 or 3 stitches long.
Have a look at Crochet Guru’s Slip Knot and Foundation Chain tutorials for step by step video’s. They explain the process far better than I could.
Step 2| Start crocheting
For my crochet ribbon I have used the double crochet stitch. It’s my favourite and to be fair, it’s the only one I know!! I used it a while back to make a chunky crochet cushion, which I still love.
Follow Crochet Guru’s Double Crochet Tutorial to get started with this stitch or any of the other stitches they have tutorials for. The style you choose doesn’t really matter, the key is to crochet only 2 or 3 stitches wide.
The length will depend on the size of the gift. I kept wrapping my crochet ribbon around the gift as a measure, making sure I had enough excess to tie a bow. Once the crochet ribbon is long enough, cut the yarn leaving 10 – 15cm tail. Loop the tail back though on itself and knot. Cut away any excess.
Step 3| Wrap the gifts
Now for the fun part…..wrapping the gifts!
Wrap the gifts in whatever paper you like, then tie the crochet ribbon around and secure in place with a bow. Making sure to arrange it so it looks symmetrical.
That’s it, project complete! Next up, giving the gift to it’s intended (the warm fuzzy part).

No Comments